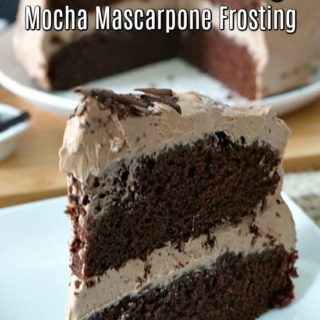
OMG. It’s the only three letters that are perfect to describe this delicious homemade cake. If you’re looking for a melt-in-your-mouth cake that is certain to take you by surprise, it’s time to make this chocolate cake with mocha mascarpone frosting. I literally had no idea that it was going to turn out to be one of my favorite cakes ever before I made it…But I can assure you that it is!

Have you ever taken a bite of something and just stood there, never wanting that moment to end? That’s how I feel about moist, tender chocolate cakes like this chocolate lover’s zucchini cake.
It’s also exactly how I felt the first time I tried this homemade chocolate cake. This recipe is actually from Bon Appétit, and I knew, when my friend Janice sent me the recipe, that it was something I needed to make as soon as possible.
The result is pure perfection. The entire process of baking this cake from start to finish was a simple one, even though there are quite a few steps to it. I can’t even begin to describe in detail how delicious the homemade mascarpone frosting is. It’s the kind of cake that I truly want to save for a special occasion, but I find myself wanting to make it all the time anyway!
Sometimes, when you find a cake recipe this good, every day is a special occasion, and that’s perfectly okay!
Jump to:

Why You’ll Love This Recipe
- Basic Ingredients: This recipe may look fancy, but the ingredients are anything but. You can find them in your kitchen and at any grocery store.
- Easy: There are several steps to this from-scratch cake, but they’re all very simple. When taken step by step, even beginners can make this cake.
- Super Moist and Tender: This is one of the most tender and moist chocolate cakes you’ll ever make.
- Rich, Deep Flavor: The addition of espresso to the batter creates a cake with deep chocolate flavor, and the mascarpone frosting is rich, creamy, and so sweet.
Ingredients
I’ve listed all the ingredients you’ll need for the cake and frosting here. You can find their exact amounts in the recipe card at the end of the post.
Chocolate Cake
- Flour
- Unsweetened cocoa powder
- Baking soda
- Salt
- Butter – room temperature
- Light brown sugar
- Eggs – room temperature
- Vanilla
- Buttermilk – room temperature
- Instant espresso
- Hot water
Mocha Frosting
- Unsweetened cocoa powder
- Instant espresso
- Heavy whipping cream – divided, chilled
- Sugar
- Mascarpone cheese – chilled
Variations
- Semi-Homemade: Add espresso powder to your favorite boxed cake mix for a semi-homemade version.
- Gluten-Free: Use a high-quality 1:1 gluten-free baking flour to make a gluten-free cake that tastes just like a traditional one.
- Double Chocolate: Fold chocolate chips into the batter for a blast of double chocolate flavor.
- Add Nuts: Chopped pecans or walnuts in the batter create a cake with an earthy note and more texture.

How to Make Chocolate Cake with Mocha Mascarpone Frosting
Chocolate Cake
- Whisk the dry ingredients in a medium bowl and set aside.
- Beat the butter until creamy. Then, add the sugar and beat again until smooth.
- Add the eggs one at a time, beating between each addition. Then, add the vanilla.
- Alternate adding half the flour, followed by half the buttermilk, beating between each addition until the ingredients are just combined. Then, mix in the hot instant espresso.
- Divide the batter equally between two prepared cake pans and bake at 325°F until a toothpick inserted into the center comes out clean.
- Cool the cakes in their pans for 15 minutes. Then, turn them out onto a wire rack to cool completely.
Frosting
- Whisk the cocoa and espresso. Then, bring 1 cup of whipping cream to a boil and slowly pour it over the cocoa mixture, whisking until it dissolves.
- Add the remaining whipping cream and sugar and stir until dissolved. Chill for at least two hours.
- Beat the mascarpone into the mixture on low speed until smooth. Then, increase the speed to high and beat until medium-firm peaks form.
- Place a cake layer on a cake stand and top it with the frosting. Then, add the second layer and frost the top and sides of the cake. Enjoy!

Tips
- Bring all your cold cake ingredients to room temperature for better mixing and the best cake texture.
- Be sure you use instant coffee for this cake. Instant coffee granules are dehydrated brewed coffee and will fully dissolve in the cake. Traditional ground coffee is ground-up coffee beans that won’t dissolve.
- Be sure your baking soda is fresh. Old baking soda will result in a cake that doesn’t rise enough or at all.
- Mix your cake batter ingredients until just combined to avoid excess gluten and a tough cake.
- To ensure your cake doesn’t break as you remove it from the pan, run a knife along its edge between the cake and the pan.
- Fully cool your cake before frosting. Otherwise, the frosting will thin as soon as it comes into contact with the warm cake.
- Stop beating your frosting as soon as medium-stiff peaks form. Overmixing can result in curdled frosting due to the friction of the mixing attachment.

Chocolate Cake with Mocha Mascarpone Frosting FAQ
Mascarpone is often used in frosting for its mild sweetness and light, fluffy texture, similar to that of whipped cream. The mascarpone gives the frosting a similar texture to whipped cream and helps stabilize the ingredients.
Mascarpone has a mild, buttery, and slightly sweet flavor with a subtle tanginess and a rich, creamy, velvety texture.
Adding espresso to chocolate cake intensifies the chocolate flavor, creating a richer, stronger chocolate taste with a hint of coffee.
Absolutely! The deep flavor of chocolate cake is the perfect pairing with rich, sweet, and slightly tangy mascarpone frosting.

More Delicious Cake Recipes


If you try this recipe and love it, please be sure to leave a 5 ★★★★★ rating below and leave a comment! You can also pin it to your favorite Pinterest boards and save it for later.
Also, follow us on Pinterest, Facebook, Instagram, and YouTube. Remember to “like” or “follow” us on all social media.

Chocolate Cake with Mocha Mascarpone Frosting
Ingredients
For The Chocolate Espresso Cake
- 2 cups all purpose flour
- ¾ cup unsweetened cocoa powder
- 1½ teaspoon baking soda
- ½ teaspoon salt
- ¾ cup butter, (1½ sticks, room temperature)
- 2 cups packed light brown sugar
- 3 large eggs
- 1½ teaspoon vanilla extract
- 1 cup buttermilk
- 4 teaspoon instant espresso coffee
- ¾ cup hot water
For The Mocha Mascarpone Frosting
- ⅓ cup unsweetened cocoa powder
- 1 tablespoon instant espresso coffee
- 1½ cups heavy whipping cream, divided, chilled
- 1⅓ cups sugar
- (2) 8 oz containers mascarpone cheese, chilled
Instructions
- Preheat oven to 325° and generously butter (2) 9 inch round cake pans and then lightly dust with flour. Cut parchment paper to fit and place in bottom of pan. Set aside.
For The Chocolate Espresso Cake
- Using a medium bowl, whisk flour, cocoa powder, baking soda and salt together, set aside.
- In a large bowl, beat butter with an electric mixture until creamy then add brown sugar and beat for approximately 2 minutes until mixture is blended and smooth.
- Add eggs one at a time beating well between additions then add vanilla.
- Add flour mixture, alternating with buttermilk in 2 additions, and beating just until blended after each addition.
- Heat water in microwave for 60 seconds, add instant espresso, stir until dissolved.
- Gradually add hot espresso mixture into cake batter beating until smooth.
- Pour batter equally into both cake pans and place on center rack in preheated 325° oven.
- Bake until toothpick inserted comes out clean, about 40 minutes.
- Remove from oven and cool on rack for 15 minutes then run a knife along the edge to loosen up the cake.
- Invert cake on rack, remove parchment paper then invert cakes upright to cool completely.
For The Mocha Mascarpone Frosting
- In a large bowl, whisk cocoa powder and espresso together.
- Using a small saucepan, bring 1 cup of whipping cream to a boil.
- Slowly pour cream over the cocoa/espresso mixture whisking until dissolved completely.
- Add remaining whipping cream and sugar to cocoa mixture, stir until dissolved.
- Place in fridge for approximately 2 hours until chilled.
- Once chilled, add mascarpone to cocoa/espresso mixture.
- Beat on low speed until smooth then increase to medium high speed and beat until mixture is thick and medium-firm peaks form when beaters are lifted, about 2 minutes (DO NOT over beat otherwise the mixture will curdle).
- Before adding frosting, use a pastry brush and brush off any crumbs on the top and sides of each cake layer.
- Place first cake layer, top side up, and add a thin layer of frosting to start. Add more frosting and once desired thickness is obtained, add the second cake layer, top side up again.
- Continue to frost cake and top with chocolate curls, optional.
Notes
- Refrigerate for up to 4 days in an airtight container.
- Bring all your cold cake ingredients to room temperature for better mixing and the best cake texture.
- Be sure you use instant coffee for this cake. Instant coffee granules are dehydrated brewed coffee and will fully dissolve in the cake. Traditional ground coffee is ground-up coffee beans that won’t dissolve.
- Be sure your baking soda is fresh. Old baking soda will result in a cake that doesn’t rise enough or at all.
- Mix your cake batter ingredients until just combined to avoid excess gluten and a tough cake.
- To ensure your cake doesn’t break as you remove it from the pan, run a knife along its edge between the cake and the pan.
- Fully cool your cake before frosting. Otherwise, the frosting will thin as soon as it comes into contact with the warm cake.
- Stop beating your frosting as soon as medium-stiff peaks form. Overmixing can result in curdled frosting due to the friction of the mixing attachment.
Nutrition
Here are a few pics that are perfect to save to your favorite Pinterest boards on Pinterest. Also, you can follow us on Pinterest, Facebook, Instagram and YouTube. Remember to “like” or “follow” us on all social media.


Sounds delish! I would like to try this in a 13 x 9 pan. Thoughts?
Hi Ellie, definitely would make it and using a 13 x 9 pan would work. You will not need as much frosting though. :)