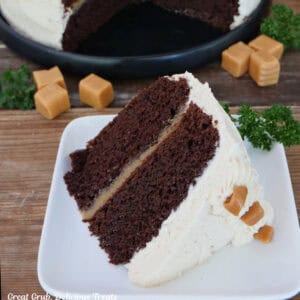
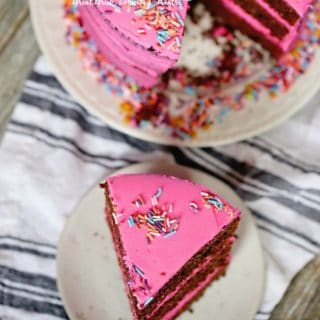
Chocolate Triple Layer Cake
Is there ever really a thing as too much chocolate? This Chocolate Triple Layer Cake is proof that there’s not. If you’re craving not one but three awesome layers of chocolate, this delicious homemade cake recipe is about to make all your chocolate dreams come true.

Have you ever wondered if you have the baking skills to make a triple-layered cake? I’m about to show you that it’s really not that hard at all. If you can follow these simple directions, you’ll be able to easily make your own chocolate cake recipe that’s packed full of three layers of flavor. (and who doesn’t love the bright pink icing all over the top and in between each layer? It makes it super bright and fun!)

Ingredients Needed To Make A Triple Layer Chocolate Cake
- Cocoa powder
- All purpose flour
- Baking powder
- Baking soda, salt
- Sugar
- Eggs
- Vegetable oil
- Greek yogurt
- Butter
- Powdered sugar
- Milk
- Vanilla
- Pink gel coloring
- Candied sprinkles
(Actual measurements are located in the recipe card below.)

How To Make A Chocolate Triple Layer Cake
- Pour boiling water into bowl with cocoa powder and whisk thoroughly until blended. Set aside.
- Beat together flour, baking powder, baking soda, sugar, oil and eggs until smooth.
- Beat in yogurt, followed by cocoa powder mixture until thoroughly mixed and no lumps remain.
- Pour cake batter into three lined/sprayed 8 or 9 inch cake pans, and bake for 30-40 minutes. *Start checking at 30 minutes to make sure you don’t overcook.
- Once toothpick inserted and has come out clean, remove cakes from oven, let cool for a few minutes, then remove from pan and place on a wire rack to cool.
- In a large bowl, beat all ingredients together until smooth and fluffy. Start with 3 cups of powdered sugar and gradually add more until the right consistence is obtained. If you add too much, balance it out with more milk, 1 Tbsp at a time.
- Cut the tops off each layer so that they are flat. Place one cake layer on a serving dish, then “plop” a generous scoop of icing on top. Spread out from the middle until you have a solid layer.
- Gently put the second layer on top, and repeat the icing process.
- Repeat with a final layer, and spread icing on top to form a smooth layer.
- To ice your sides, spread small spoonfuls all over the sides of the cake, and with a long icing spreader or paddle, scrape the sides all the way around so that you have a “bare” iced look. This step doesn’t have to be perfect, so make it look however you like.
- Top with sprinkles or decorations of your choice. Cut and serve.

How Do I Make The Cakes Stack On Top Of Each Other Without Falling Off?
This is actually probably the hardest part of the recipe. In order to have your cake stack easily on top, you’re going to want to do a few different things.
First off, each baked cake will have a little bit of roundness to it once you pull them from the oven. Let them cool completely and then cut off that rounded cooked part of the cake. Make certain that you’re careful and that you only remove the rounded part. What that then does is give you a flat top and bottom to your cake layers that you can easily stack.
The other thing is to make certain that your cakes are cooled completely. If you try to ice them and stack them when they’re hot or warm, the icing will melt and there’s a chance that the cakes will just slide off.

Is there a way to add flavor to the icing?
There actually is! I have a lot of people who think that the pink icing should be flavored like cherry or strawberry and if that’s what you want to do, just buy some of those flavorings and add them in. It’s really as simple as that.
I also think that if you’re making this for a holiday cake, adding in some peppermint to the frosting would make a really cool flavor as well. Chocolate and peppermint? Yes, please.

How hard is it to frost the sides of this Chocolate Triple Layer Cake?
It’s not overly difficult but it will take some getting used to. Just keep in mind that you’re making this cake out of love so please don’t put the pressure of perfection on your shoulders to try and complete this. This, by all means, is not perfect.
The easiest way to ice the sides of this cake would be to add it in globs to the side and then smooth it out slowly, all in the same direction. As long as you’re doing this, you should be fine with the outcome.
The problems will start to happen if you’re trying to rub the icing back and forth in different directions or trying to add on the frosting too thick to be able to effectively spread and manage. You can always do a thin layer to start to get it nice and coated and then follow up with a second layer after that.
Have fun making this Chocolate Triple Layer cake. Not only it is giant and fun to eat, but it really is the perfect balance between chocolate, frosting, chocolate, frosting….and chocolate, frosting. And if you really wanted to make this cake something amazing, you could even make this recipe stretch and make a four-layer cake as well. The layers will be a bit thinner but they’ll still have that taste and look that everyone will love.

Make This Delicious Chocolate Cake Today

Here are a few more delicious cake recipes that can be found on the blog:
Chocolate Triple Layer Cake
Ingredients
For The Chocolate Cake
- 1 ½ cups cocoa powder
- 1 ½ cups boiling water
- 4 cups all purpose flour
- 2 ½ tsp baking powder
- 2 tsp baking soda
- 2 ½ cups sugar
- 1 ½ cups vegetable oil
- 5 eggs
- 1 cup Greek yogurt (plain)
For The Pink Buttercream Frosting
- 2 sticks butter
- 4 cups powdered sugar (start with 3, then add more while mixing until the texture is right)
- 3-4 Tbsp milk
- 1 tsp vanilla extract
- Pink gel coloring (or your choice)
- Optional: candied sprinkles, mini chocolate chips, additional icing
Instructions
- Preheat oven to 350° and line (3) 8 or 9 inch cake pans with parchement paper and spray with non stick spray. Set aside.
For The Chocolate Cake
- Pour boiling water into bowl with cocoa powder and whisk thoroughly until blended. Set aside.
- Beat together flour, baking powder, baking soda, sugar, oil and eggs until smooth.
- Beat in yogurt, followed by cocoa powder mixture until thoroughly mixed and no lumps remain.
- Pour cake batter into three lined/sprayed 8 or 9 inch cake pans, and bake for 30-40 minutes. *Start checking at 30 minutes to make sure you don't overcook.
- Once toothpick inserted and has come out clean, remove cakes from oven, let cool for a few minutes, then remove from pan and place on a wire rack to cool.
For The Pink Buttercream Frosting
- In a large bowl, beat all ingredients together until smooth and fluffy. Start with 3 cups of powdered sugar and gradually add more until the right consistence is obtained. If you add too much, balance it out with more milk, 1 Tbsp at a time.
- Cut the tops off each layer so that they are flat. Place the first layer on a serving dish, then "plop" a generous scoop of icing on top. Spread out from the middle until you have a solid layer.
- Gently put the second layer on top, and repeat the icing process.
- Repeat with a final layer, and spread icing on top to form a smooth layer.
- To ice your sides, spread small spoonfuls all over the sides of the cake, and with a long icing spreader or paddle, scrape the sides all the way around so that you have a "bare" iced look. This step doesn't have to be perfect, so make it look however you like.
- Top with sprinkles or decorations of your choice. Cut and serve.
- Notes: Cake can be made into three thick layers or four smaller layers - great to customize.
- Want flavoring? Add some strawberry flavoring oil or other flavors to the icing when mixing.
- Customize this cake by adding as much or as little decorations as you like, including edge icing, different sprinkles, mini chocolate chips, or fresh fruit such as berries on top.
Here are a few pics that are the perfect size for pinning to Pinterest.


Enjoy, Terri
Copyright © Great Grub, Delicious Treats. All content and images are copyright protected. Do not use any images without prior permission. If you want to republish this recipe, make sure to re-write the recipe in your own words and only list ingredients making sure to link back to this post for the original recipe and directions.